EN
EN

In modern manufacturing environments where downtime translates directly to lost revenue, the ability to perform round belt welding and installation on-site has become a critical skill for maintenance teams. Zero-gap production demands that conveyor systems, automated machinery, and transmission assemblies operate continuously without interruption. Traditional belt replacement methods requiring machine disassembly or off-site fabrication create unacceptable production delays. This comprehensive guide explains the precise methodology for welding and installing round belts directly at the point of use, enabling facilities to maintain seamless operations while achieving professional-grade belt joints that match or exceed factory-spliced performance standards.
The strategic advantage of mastering on-site round belt welding extends beyond immediate time savings. Facilities equipped with proper welding capabilities can respond instantly to belt failures, customize belt lengths for unique machine configurations, and eliminate dependency on external suppliers for emergency replacements. Whether working with polyurethane or rubber round belts in diameters ranging from 2mm to 25mm, the welding process follows consistent principles while requiring material-specific temperature control and preparation techniques. Understanding the complete workflow from initial measurement through final tensioning ensures that maintenance personnel can deliver reliable results under production-critical conditions.
Understanding Round Belt Welding Fundamentals for Industrial Applications
Material Science Behind Thermal Joining of Round Belts
Round belt welding relies on controlled thermoplastic fusion where heat energy transforms the molecular structure of belt materials at the joint interface. Polyurethane belts, composed of thermoplastic elastomers, exhibit ideal welding characteristics due to their ability to melt, flow, and re-solidify while maintaining tensile strength. The welding temperature must reach the material's melting point without causing thermal degradation of the polymer chains. For standard polyurethane round belts, this optimal temperature range typically falls between 180°C and 220°C depending on the specific formulation and durometer hardness. Rubber round belts require different thermal parameters, generally necessitating higher temperatures between 240°C and 280°C along with extended heating duration to achieve proper molecular cross-linking at the joint.
The quality of round belt welding depends critically on achieving uniform heat distribution across the entire cross-sectional area of both belt ends. Incomplete heating creates weak zones where unbonded material becomes the failure initiation point under operational stress. Professional welding equipment incorporates precision-controlled heating elements with thermostatic regulation to maintain consistent temperature throughout the joining cycle. The molecular bonding process requires not just heat application but also controlled pressure to force the softened material surfaces into intimate contact, eliminating microscopic air gaps that would compromise joint strength. Modern joining systems integrate both thermal and mechanical parameters into automated cycles that remove human variability from the critical bonding phase.
Equipment Requirements and Specification Criteria
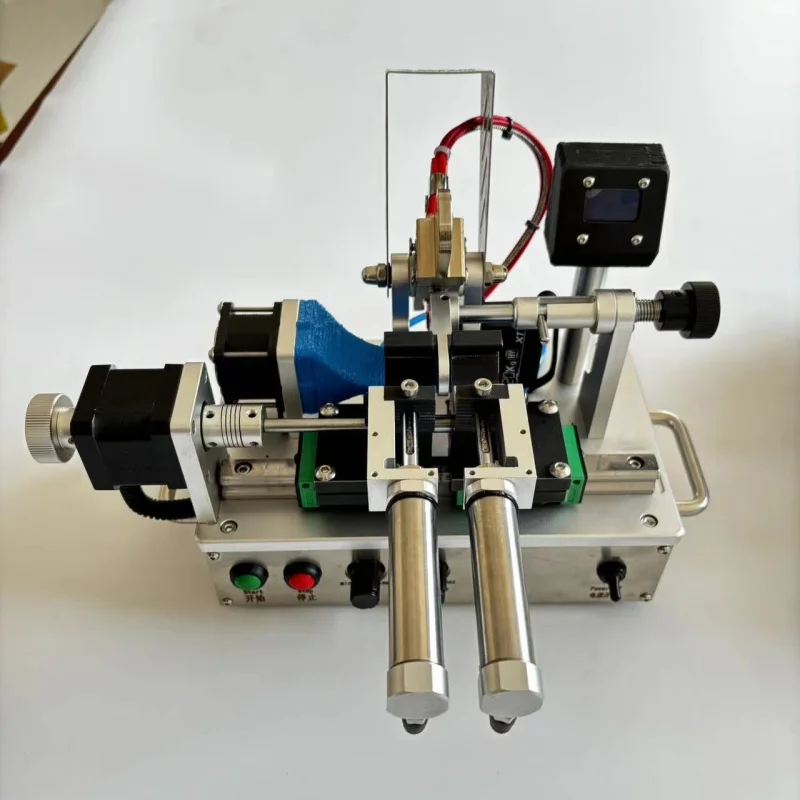
Successful on-site round belt welding necessitates purpose-designed equipment that addresses the unique challenges of thermoplastic belt joining. Manual welding tools provide basic functionality for emergency repairs but lack the precision control required for production-grade installations. Semi-automatic systems offer improved consistency through regulated heating cycles while still requiring operator skill for proper belt preparation and alignment. Fully automatic round belt welding machines represent the professional standard, incorporating microprocessor control, optical alignment systems, and programmable heating profiles that adapt to different belt materials and diameters.
When evaluating welding equipment for industrial applications, several technical specifications determine operational capability and joint quality outcomes. Temperature range and control precision directly affect material compatibility, with systems requiring adjustability across at least 150°C to 300°C to accommodate various belt formulations. Heating element geometry must match the cylindrical profile of round belts, utilizing specially contoured surfaces or rotating elements that apply uniform thermal energy around the entire circumference. Clamping mechanisms should provide adjustable pressure calibrated to belt diameter, preventing deformation of small-diameter belts while ensuring adequate compression for larger profiles. Timer functions with accuracy to within one second enable repeatable cycle control, critical for maintaining consistent joint quality across multiple installations.
Critical Safety Protocols for Thermal Joining Operations
The thermal processes involved in round belt welding present specific hazards that require systematic safety protocols. Heating elements operating at temperatures exceeding 200°C pose severe burn risks during operation and for several minutes following the welding cycle as components cool. Molten polyurethane and rubber release volatile organic compounds that may cause respiratory irritation in poorly ventilated spaces. Establishing designated welding areas with adequate ventilation systems protects operators from fume exposure while containing thermal hazards away from flammable materials. Personal protective equipment including heat-resistant gloves, safety glasses, and respiratory protection when working in confined spaces forms the baseline safety requirement for all welding operations.
Electrical safety considerations warrant particular attention given the high-power requirements of industrial welding equipment. Systems typically operate on 110V or 220V power supplies with heating element currents that may exceed 10 amperes. Ground fault protection and proper electrical grounding prevent shock hazards, especially important in manufacturing environments where moisture or metal surfaces create additional conductivity risks. Equipment shutdown procedures must ensure complete power disconnection before any maintenance activities, as residual heat in thermal elements creates delayed burn hazards even after power removal. Training programs should emphasize that safe round belt welding practices protect not just the operator but also surrounding personnel and facility assets from thermal and electrical risks.
Preparing Round Belts for On-Site Welding Installation
Accurate Measurement and Belt Length Calculation
Precision in belt length determination directly impacts both the welding process and final installation performance. The measurement process begins with identifying the exact routing path the round belt will follow, including all pulley contact points, guide positions, and any offset configurations. For replacement applications, measuring the existing belt provides a starting reference, but worn belts often exhibit elongation that makes them unreliable for new installation sizing. The preferred method involves using non-stretch measurement tape or precision string to trace the actual belt path under normal tension conditions, then transferring this measurement to the new belt material.
Calculating the correct belt length for round belt welding requires accounting for material removal during the joining process. Each welding operation removes approximately 2-4mm of belt length through the cutting and melting phases, a factor that must be added to the measured path length. Additionally, the specific material properties influence optimal initial tension, with polyurethane belts typically requiring 2-4% elongation at installation to achieve proper running tension after initial break-in. For a 1000mm path length, this translates to cutting the belt to approximately 1020-1040mm before welding, then installing with slight stretch. Experienced technicians maintain reference charts correlating belt diameter, material type, and application speed with precise length compensation factors.
Belt End Preparation and Surface Treatment
The condition of belt end surfaces profoundly affects round belt welding joint quality, making preparation one of the most critical phases in the installation process. Both belt ends must be cut perfectly square to the longitudinal axis, creating flat surfaces that mate uniformly across the entire cross-section. Angled or irregular cuts result in incomplete contact during welding, producing joints with reduced strength and premature failure potential. Professional cutting methods employ specialized belt cutters with fixed blade angles or rotating cutting wheels that slice cleanly through the belt material without compression or deformation. Manual cutting with razor blades or utility knives requires exceptional skill to achieve acceptable squareness, making dedicated cutting tools the preferred standard.
Surface contamination prevents proper molecular bonding during the thermal joining process, necessitating thorough cleaning of both belt ends immediately before welding. Manufacturing residues, handling oils, dust accumulation, and environmental contaminants create barrier layers that inhibit polymer fusion. The cleaning protocol involves wiping both belt ends with lint-free cloths dampened with isopropyl alcohol or approved solvent cleaners compatible with the belt material. After solvent cleaning, allowing 30-60 seconds for complete evaporation prevents moisture contamination of the weld zone. For belts used in food processing or pharmaceutical applications, specialized cleaning agents meeting regulatory requirements replace standard industrial solvents. The prepared belt ends should be handled only at areas away from the cut surfaces to prevent recontamination before the welding operation begins.
Material-Specific Preparation Considerations
Different round belt materials require adapted preparation approaches to optimize welding outcomes. Polyurethane belts with shore hardness ratings between 85A and 95A represent the most common industrial application, offering excellent abrasion resistance and flexibility. These materials respond well to standard preparation protocols with minimal special treatment beyond proper cleaning and cutting. Harder polyurethane formulations above 95A shore may benefit from light surface abrading using fine-grit sandpaper to increase surface area and improve molecular interlocking during fusion. This mechanical preparation creates microscopic surface roughness that enhances joint strength without compromising belt integrity.
Rubber round belts present distinct preparation challenges due to their thermosetting polymer structure and potential sulfur content from vulcanization processes. While round belt welding of rubber materials is technically feasible, achieving bonds comparable to polyurethane joints requires extended heating cycles and higher temperatures. Some rubber formulations benefit from application of primer compounds specifically designed to promote adhesion, though these must be compatible with subsequent heating to prevent outgassing or contamination. For critical applications involving rubber round belts, conducting test welds on scrap material using the planned preparation protocol validates the process before committing to production installation. Material specification sheets from belt manufacturers often include welding recommendations that should be consulted during preparation planning.
Executing the Round Belt Welding Process
Equipment Setup and Parameter Configuration
Proper configuration of welding equipment establishes the foundation for successful round belt welding outcomes. The setup sequence begins with verifying power supply compatibility and establishing stable electrical connections that prevent voltage fluctuations during the heating cycle. Welding machines should be positioned on stable, level surfaces with adequate clearance for belt manipulation and operator access from multiple angles. For portable equipment used in field installations, securing the device to prevent movement during the joining process ensures consistent alignment throughout the operation. Pre-warming the welding equipment for 5-10 minutes before actual use stabilizes thermal elements and improves temperature control accuracy.
Parameter selection requires matching welding settings to the specific combination of belt material, diameter, and durometer hardness. Temperature setting represents the primary control variable, with manufacturer guidelines providing starting points that may require adjustment based on ambient conditions and specific material batches. Belt diameter influences both temperature and time parameters, as larger cross-sections require extended heating duration to achieve uniform thermal penetration to the core. Most professional systems allow programming of multi-stage heating profiles where initial temperature ramps, hold periods, and cooling rates can be independently controlled. Recording successful parameter combinations for frequently used belt types streamlines future installations and builds institutional knowledge within maintenance teams.
Belt Loading and Alignment Procedures
Achieving perfect alignment of belt ends within the welding fixture determines whether the resulting joint operates smoothly or creates vibration and premature wear. The loading process begins with inserting both prepared belt ends into their respective clamping mechanisms, positioning them so that cut surfaces face each other with minimal initial gap. Clamps must secure the belt firmly without over-compression that deforms the circular cross-section, particularly critical for smaller diameter belts where excessive pressure easily distorts the profile. Visual alignment checks from multiple angles confirm that both belt axes lie perfectly co-linear, with no angular offset that would create stepped joints.
Many advanced round belt welding systems incorporate optical alignment aids or mechanical alignment guides that simplify this critical setup phase. Laser alignment systems project reference lines that operators use to verify belt positioning before initiating the heating cycle. Mechanical guides featuring matched cylindrical grooves cradle the belt ends, automatically establishing proper alignment when belts are fully seated. For manual systems lacking these aids, fabricating simple alignment fixtures from precision-drilled blocks provides repeatable positioning references. The alignment verification step should never be rushed, as correcting angular misalignment after welding completion proves impossible without cutting the joint and repeating the entire process.
Heating Cycle Execution and Monitoring
The heating phase of round belt welding requires vigilant monitoring to catch any anomalies that might compromise joint quality. After initiating the automated heating cycle, operators should observe the belt ends for uniform softening indicated by slight surface gloss development and beginning material flow. Uneven heating manifests as differential melting where portions of the belt cross-section soften before others, often resulting from improper contact between heating elements and belt surfaces. Detecting this condition early allows cycle interruption, repositioning of belt ends, and restart before significant material degradation occurs.
Temperature monitoring throughout the welding cycle provides quality assurance beyond simple timer-based control. Systems equipped with thermocouples or infrared sensors display real-time temperature readings that operators compare against target parameters. Significant deviations from programmed temperatures signal equipment malfunction or unusual material response requiring immediate attention. The visual appearance of the belt material at the heated zone offers additional feedback, with properly heated polyurethane developing a clear, glossy molten surface while overheated material exhibits browning or bubbling. Experienced operators develop recognition of optimal heating completion through these visual cues, supplementing automated timer controls with practical observation skills.
Joining and Compression Application
Following completion of the heating cycle, the joining phase demands swift, decisive action to bring molten belt ends together before cooling initiates. Automated round belt welding systems execute this step through programmed sequences that advance one or both clamping mechanisms, pressing the heated surfaces together with controlled force. Manual systems require operator skill to quickly close the gap while applying appropriate compression pressure. The compression force must be sufficient to flatten the molten material layers, forcing intimate molecular contact across the entire joint interface while expelling any trapped air or contaminants. Insufficient pressure leaves weak bonds, while excessive force extrudes molten material from the joint, reducing cross-sectional area and creating stress concentration points.
The duration of compression application critically affects final joint strength in round belt welding operations. Premature release allows the joint to separate slightly before solidification completes, creating internal voids that weaken the bond. Industry best practices recommend maintaining compression for 10-30 seconds depending on belt diameter, with larger profiles requiring extended hold times to accommodate their greater thermal mass. During this hold period, the joint transitions from molten to semi-solid to fully solidified state, with the timing influenced by ambient temperature and belt material thermal conductivity. Visual observation typically shows the formation of a slight flash or bead of excess material around the joint circumference, indicating that adequate material flow and compression occurred. This flash will be addressed during the subsequent finishing operations.
Post-Welding Finishing and Installation Procedures
Joint Trimming and Surface Finishing Techniques
The solidified weld joint typically exhibits excess material flash protruding from the circumference, requiring removal to prevent interference with pulleys and guides during operation. Trimming this excess material demands precision to avoid cutting into the base belt or creating surface irregularities that generate vibration. The preferred trimming method employs sharp utility knives or specialized trimming tools designed for round belt applications, making shallow circumferential cuts that shave away raised material while preserving the joint integrity. Multiple light passes prove more effective than aggressive single cuts, progressively reducing the flash until the joint diameter matches the adjacent belt sections.
Surface finishing beyond basic flash removal enhances belt performance in applications involving close-tolerance guides or high-speed operation. Fine-grit sandpaper wrapped around cylindrical forms allows smoothing the joint area to eliminate any remaining surface irregularities. The sanding motion should follow the belt's longitudinal axis rather than circumferentially to avoid creating grooves that trap debris or cause premature wear. After mechanical finishing, wiping the joint area with a clean cloth removes sanding residue that might contaminate bearing surfaces or pulleys. The finished joint should be visually indistinguishable from the surrounding belt when viewed from normal working distance, indicating proper execution of round belt welding and finishing procedures.
Joint Quality Inspection and Strength Verification
Systematic inspection of completed welds before installation prevents field failures that could disrupt production. Visual examination forms the first inspection level, checking for obvious defects including incomplete fusion, air voids visible at the joint interface, discoloration indicating thermal degradation, or geometric irregularities suggesting misalignment during welding. The joint should exhibit complete bonding across the entire cross-section with no visible separation or gap when examined from all angles. Color consistency between the joint and base belt material indicates proper temperature control without overheating.
Physical testing provides quantitative assessment of joint strength beyond visual evaluation. A simple manual test involves grasping the belt on either side of the joint and applying moderate tensile force, sufficient to stretch the belt slightly but not approaching break strength. Properly executed round belt welding produces joints that feel as rigid and strong as the base belt material with no detectable weakness or flexibility at the bonded area. For critical applications, conducting destructive pull tests on sample joints created with identical parameters validates process capability before committing to production installations. These test specimens should fail in the base belt material rather than at the joint, demonstrating that weld strength meets or exceeds belt tensile strength specifications.
Installation Tensioning and Initial Setup
Installing the welded round belt onto machinery requires careful attention to tensioning that balances adequate grip without overstressing the material or bearings. The installation process typically begins with routing the belt around all pulleys and through guides while the drive system remains de-energized and locked out per safety protocols. Initial belt tension should provide moderate resistance when pressed at mid-span between pulleys, typically deflecting 10-15mm under moderate finger pressure for spans of 300-500mm. This preliminary tension ensures the belt maintains pulley contact without slippage while allowing for material elongation during the break-in period.
Many drive systems incorporate adjustable mounting positions or tensioning mechanisms that allow post-installation tension modification. For applications lacking built-in adjustment capability, achieving correct installed length through accurate pre-welding measurement becomes critical. The initial installation phase should include monitoring belt behavior during the first hours of operation, watching for signs of excessive slip indicating insufficient tension or bearing temperature rise suggesting over-tensioning. Polyurethane round belts typically experience 1-3% elongation during the first 24-48 hours of operation as the material conforms to pulley profiles and operating loads. Planning for retensioning after this initial break-in period ensures optimal long-term performance from the welded belt installation.
Optimizing Zero-Gap Production Through Strategic Belt Management
Predictive Maintenance and Proactive Belt Replacement
Achieving true zero-gap production requires transitioning from reactive belt failure response to predictive replacement strategies. Implementing scheduled inspection intervals allows maintenance teams to identify belts approaching end-of-life before catastrophic failure occurs. Visual indicators of impending belt failure include surface cracking, dimensional changes indicating material degradation, visible wear at high-friction contact points, and discoloration suggesting thermal or chemical damage. Quantitative assessment through belt elongation measurement provides objective criteria for replacement decisions, with elongation exceeding 5-7% from original length typically warranting proactive replacement.
Establishing standardized round belt welding procedures and maintaining properly configured welding equipment enables rapid response when replacement becomes necessary. Facilities achieving the highest operational availability maintain spare belt stock in commonly used diameters and materials, pre-cut to standard lengths for frequent applications. This preparation reduces replacement time from hours to minutes, as technicians can execute the welding process immediately without measuring, cutting, and preparing raw belt material. Documentation of successful welding parameters for each belt type eliminates troubleshooting time, allowing even less-experienced operators to achieve consistent results by following proven procedures.
Training Programs for Maintenance Team Capability Building
Developing internal expertise in round belt welding delivers strategic advantages beyond emergency response capability. Comprehensive training programs should address not just the mechanical execution of welding procedures but also the underlying principles governing joint quality. Understanding how temperature, pressure, and timing interact allows technicians to troubleshoot unusual situations and adapt procedures to new belt materials or applications. Hands-on practice with scrap material builds muscle memory and confidence before technicians execute production-critical installations.
Structured competency validation ensures that personnel entrusted with round belt welding possess adequate skill levels. Practical assessments might include completing welds on various belt diameters and materials, then subjecting joints to tensile testing to verify strength standards. Creating visual reference standards showing acceptable versus defective welds helps operators develop quality discrimination skills. Regular refresher training addresses equipment updates, new belt materials entering the facility, and lessons learned from previous installation challenges. Organizations that invest systematically in maintenance team capability building achieve measurably higher first-time success rates and reduced installation time compared to facilities relying on informal knowledge transfer.
Economic Analysis of In-House Welding Capability
The financial justification for developing on-site round belt welding capability extends beyond direct material cost savings. Quantifying the total cost of belt replacement includes production downtime, emergency shipping charges for expedited replacement parts, and potential overtime labor costs when failures occur outside normal working hours. For a manufacturing line generating $5,000 per hour in revenue, even a two-hour downtime incident costs $10,000 in lost production, far exceeding the typical cost of welding equipment investment. Facilities experiencing more than three to four belt failures annually generally achieve positive return on investment within the first year of implementing in-house welding capability.
Additional economic benefits emerge from the flexibility to optimize belt installations for specific applications. On-site round belt welding allows creating custom belt lengths that improve drive efficiency, reduce vibration, or accommodate unique machine configurations impossible with standard pre-made endless belts. The ability to experiment with different belt materials and configurations without requiring external fabrication services accelerates process improvement initiatives. For organizations operating multiple facilities, developing welding expertise at a central location can support satellite sites through mobile service visits or by providing pre-welded belts for common applications, multiplying the return on training and equipment investment across the broader enterprise.
FAQ
What is the typical strength of a properly welded round belt joint compared to the base belt material?
When round belt welding is executed correctly using appropriate equipment and parameters, the resulting joint typically achieves 85-95% of the base belt's tensile strength. High-quality welds on polyurethane belts can reach or even exceed 100% base material strength due to molecular interlocking during the fusion process. The joint strength depends critically on achieving complete fusion across the entire cross-section, proper alignment eliminating stress concentration, and appropriate cooling under compression. Joints that fail below 80% base material strength indicate process deficiencies such as insufficient heating temperature, inadequate compression pressure, contaminated surfaces, or misalignment during welding. For most industrial applications, joints achieving 85% or greater base material strength provide service life equivalent to the belt itself, with failure occurring in the belt rather than at the weld when operational limits are exceeded.
Can round belt welding be performed successfully on rubber belts or only polyurethane materials?
Round belt welding is feasible on both rubber and polyurethane belts, though polyurethane materials generally produce superior results with simpler procedures. Polyurethane's thermoplastic nature allows clean melting and re-solidification that creates strong molecular bonds without chemical cross-linking requirements. Rubber belts, being thermoset materials, present greater challenges as their vulcanized structure resists simple thermal fusion. Successful rubber round belt welding requires higher temperatures, extended heating cycles, and often benefits from specialized bonding agents or surface preparation techniques. Some rubber formulations, particularly those with high sulfur content or specific filler materials, may not achieve adequate bond strength through thermal welding alone and require mechanical splicing methods instead. Material specification sheets from manufacturers indicate welding suitability, and conducting test welds on sample material before critical installations validates process capability for specific rubber formulations.
How long should maintenance personnel allow newly welded round belts to cool before installation?
The cooling period required after round belt welding depends on belt diameter and material thermal properties, but general industry practice recommends allowing 3-5 minutes minimum cooling time before handling the joint area and 10-15 minutes before installing the belt onto machinery. Smaller diameter belts below 6mm cool more rapidly due to their lower thermal mass and may be safely handled after the shorter cooling period. Larger diameter belts above 12mm retain heat longer and benefit from extended cooling to ensure complete solidification throughout the joint cross-section. Premature installation before adequate cooling completes risks deforming the still-pliable joint when stretching the belt around pulleys, potentially creating weakness or geometric irregularities. The joint area should feel cool to touch and exhibit the same hardness as the surrounding belt material before proceeding with installation. For production-critical applications where time is extremely limited, directing ambient air across the joint using fans accelerates cooling without requiring compressed air that might contaminate the bond interface.
What are the most common causes of premature failure in welded round belt joints?
The majority of premature round belt welding joint failures trace to five primary causes: inadequate surface preparation leaving contaminants that prevent proper fusion, insufficient heating temperature resulting in incomplete molecular bonding, misalignment during welding creating stress concentration points, improper tension during installation causing excessive strain on the joint, and environmental exposure to chemicals or temperatures exceeding belt material specifications. Surface contamination from oils, dust, or handling residue ranks as the single most frequent cause of weak joints that appear acceptable visually but fail under operational loads. Temperature-related issues occur when operators use settings optimized for different belt materials or fail to account for ambient temperature effects on welding equipment performance. Alignment problems become apparent through joints that create visible steps or angles, producing vibration and concentrated wear. Proper training that addresses all these factors, combined with standardized procedures and appropriate equipment, reduces premature joint failures to negligible levels in well-managed maintenance programs.
Table of Contents
- Understanding Round Belt Welding Fundamentals for Industrial Applications
- Preparing Round Belts for On-Site Welding Installation
- Executing the Round Belt Welding Process
- Post-Welding Finishing and Installation Procedures
- Optimizing Zero-Gap Production Through Strategic Belt Management
-
FAQ
- What is the typical strength of a properly welded round belt joint compared to the base belt material?
- Can round belt welding be performed successfully on rubber belts or only polyurethane materials?
- How long should maintenance personnel allow newly welded round belts to cool before installation?
- What are the most common causes of premature failure in welded round belt joints?